Chapter 0 - Preliminaries
This section will first present what Python is. Then, it will show and demistify the main steps to set Python and Anaconda environment on any laptop.
First, why Python ?
Python is a general-purpose interpreted programming language which has the particularity of being very readable and pragmatic. It has a very large base of external modules, especially scientific ones, which makes it particularly attractive for programming mathematical problems. The fact that Python is an interpreted language makes it slower than compiled languages, but on the other hand it ensures a great speed of development which allows the human to work a little less while the computer will have to work a little more. This particularity has made Python one of the main programming languages used by scientists.
Prerequisites
The prerequisite would be to know the basics of the Python language, for example as taught in the last year’s course.
People who are not familiar with the basics of the Python language should take the MOOC (Massive Open Online Course) Python 3 : des fondamentaux aux concepts avancés du langage available on the website of France Université Numérique. In case access is restricted, the videos of the MOOC are available on YouTube.
In addition, the realization of the exercises requires access to a computer or an online service with Python 3.6 (or more recent) completed by the following modules: numpy, scipy, sympy, matplotlib, numba, networkx and pandas. The use of a code editor allowing writing in Python is also highly recommended. It is suggested here to use Jupyter Lab, which allows both writing interactive notebooks and scripts and also adding one’s own solutions below the statements, which is very convenient. It is not necessary to use Jupyter Lab, other environments are also suitable, such as Spyder or Jupyter Notebook.
The following sections describe how to install and run the Python environment or use it online without installation.
Documentation
It is generally not useful (nor desirable) to know all the functions and subtleties of the Python language for occasional use. On the other hand, it is essential to know how to use the documentation effectively. The official documentation is available at https://docs.python.org/. The language and version can be selected on the top left. It is highly recommended to look at how the documentation is written and learn how to use it.
Installation
Those unable or unwilling to install Python can go directly to the 1.5 Launching Jupyter Lab section for alternatives available online without installation.
There are essentially four ways to install Python and the modules required to run the exercises:
-
Anaconda is a complete Python distribution, i.e. it directly installs a very large quantity of modules (much more than we actually need). The advantage of this installation is that it is very simple; the disadvantage is that it takes up a lot of disk space. This is the preferred method if you are running Windows or MacOS and do not have disk space problems.
-
Miniconda is a light version of Anaconda, which installs only the base by default. The advantage is that it takes up little disk space, but it requires an additional action to install the modules needed. This is the preferred method if you are on Windows or MacOS and have little disk space available.
-
Linux repositories: Most Linux distributions allow you to install Python and the basic modules directly from the package repositories that come with them. This is the preferred method under Linux.
-
Pip is a package manager for Python. This is the preferred method to add a module if Python is already installed by your operating system, and this module is not included in the packages of your distribution. This method allows a more fine and advanced management of installed modules than what is proposed with the previous methods.
Installation with Anaconda
The easiest way to install Python 3 and all necessary dependencies on Windows and MacOS is to install Anaconda. The disadvantage of Anaconda is that it takes a lot of disk space to install because so many modules are installed by default. Detailed installation procedures according to each operating system are described at: https://docs.anaconda.com/anaconda/install/. In summary the installation procedure is as follows:
-
Download Anaconda for Python 3 at: https://www.anaconda.com/products/individual#Downloads.
-
Double-click on the downloaded file to start the installation of Anaconda, then follow the installation procedure (it is not necessary to install VS Code).
-
Once the installation is complete, launch Anaconda Navigator from the start menu or from the list of applications.
Installation with Miniconda
The Miniconda distribution has the advantage over Anaconda of taking up little disk space, at the cost of having to install the necessary modules manually. The quick installation procedure is as follows:
- Download Miniconda for Python 3 at: https://docs.conda.io/miniconda.html.
- Double-click on the downloaded file to start the Miniconda installation, then follow the installation procedure.
- Once the installation is complete, launch Anaconda Prompt from the Start menu or from the list of applications.
- In the terminal, type the command:
conda install anaconda-navigator numpy scipy sympy matplotlib numba networkx pandas jupyterlaband confirm the installation of the dependencies.
Installation from repositories
Most Linux distributions allow to easily install Python and the most standard modules directly from the repositories they include. The following procedure is for Ubuntu, but can be easily adapted to other distributions.
- Install Python 3: sudo apt install python3 python-pip3
- Install the
numpy,scipy,sympy,matplotlib,numba,networkxandpandasmodules: sudo apt install python3-numpy python3-scipy python3-sympy python3-matplotlib python3-numba python3-networkx python3-pandas - Jupyter Lab is not available in Ubuntu packages, so it must be installed with Pip: pip3 install jupyterlab
Note:
Depending on the operating system, you may have to replace the pip3 command with pip. If you encounter permissions problem when running these commands, you should probably add --user to the end of the previous command.
Advanced Installation with Pip
The following procedure describes the manual installation of modules with the Pip manager.
- Install Python from the address: https://www.python.org/downloads/.
- Install Pip from the address: https://pip.pypa.io/en/stable/installation/
- Install the required modules by typing the following command line in a terminal:
pip3 install numpy scipy sympy matplotlib numba networkx pandas jupyterlab
Note:
Depending on the operating system, you may have to replace the
pip3command withpip. If you encounter permissions problem when running these commands, you should probably add--userto the end of the previous command.
Lauching Jupyter Lab
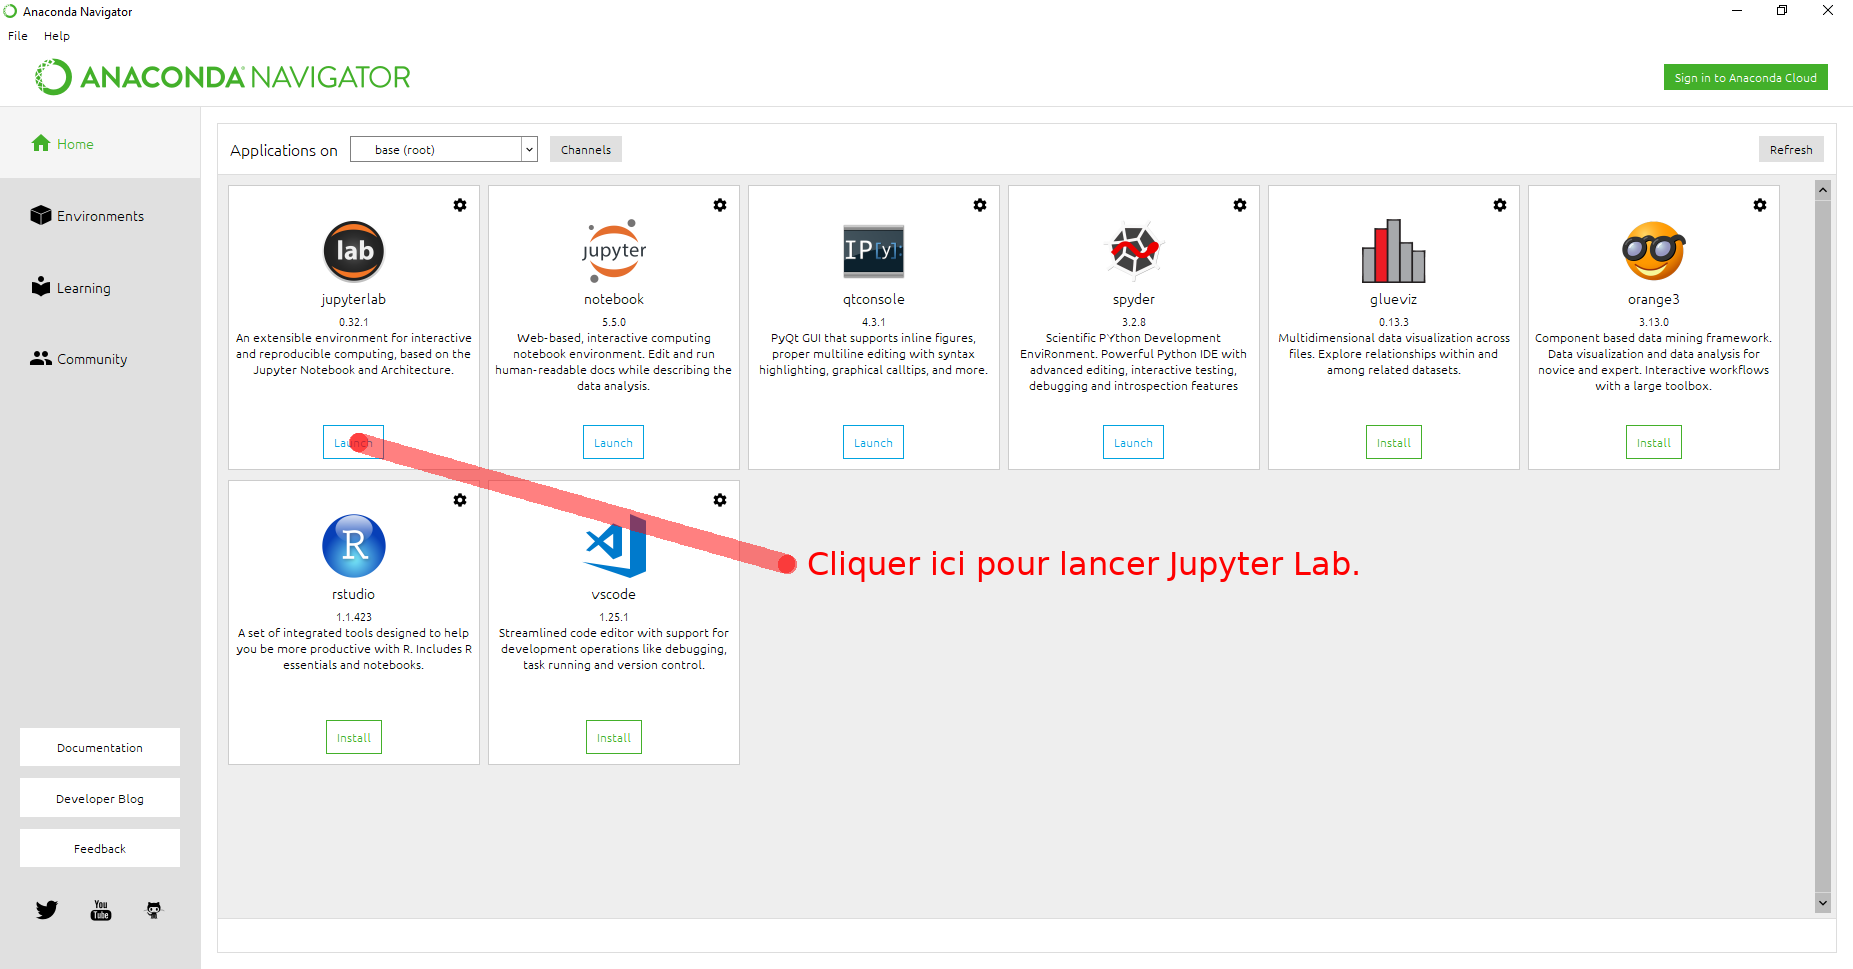
With Anaconda Navigator
If Anaconda or Miniconda has been installed, simply launch Anaconda Navigator and click on the “jupyterlab” icon:
In the command line
To run Jupyter Lab from the command line, type jupyter lab in a terminal. To quit, you have to click on “Shutdown” in the “File” menu of the Jupyter Lab window. It is also possible to type Ctrl+C followed by y (in English) or o (in French) in the terminal where the jupyter lab command was executed.
Online without installation
For people who cannot or do not want to install Python and the necessary dependencies on their own computer, it is possible to use Jupyter Lab online with GESIS by clicking here. No account is required but documents stored without a user account are automatically deleted so it is imperative to save them on your own computer before leaving. It is also possible to create a user account on GESIS at https://notebooks.gesis.org/hub/, which then allows you to save your documents.
Otherwise, different services offer the possibility to use Jupyter Lab for free after creating an account:
Using Jupyter Lab
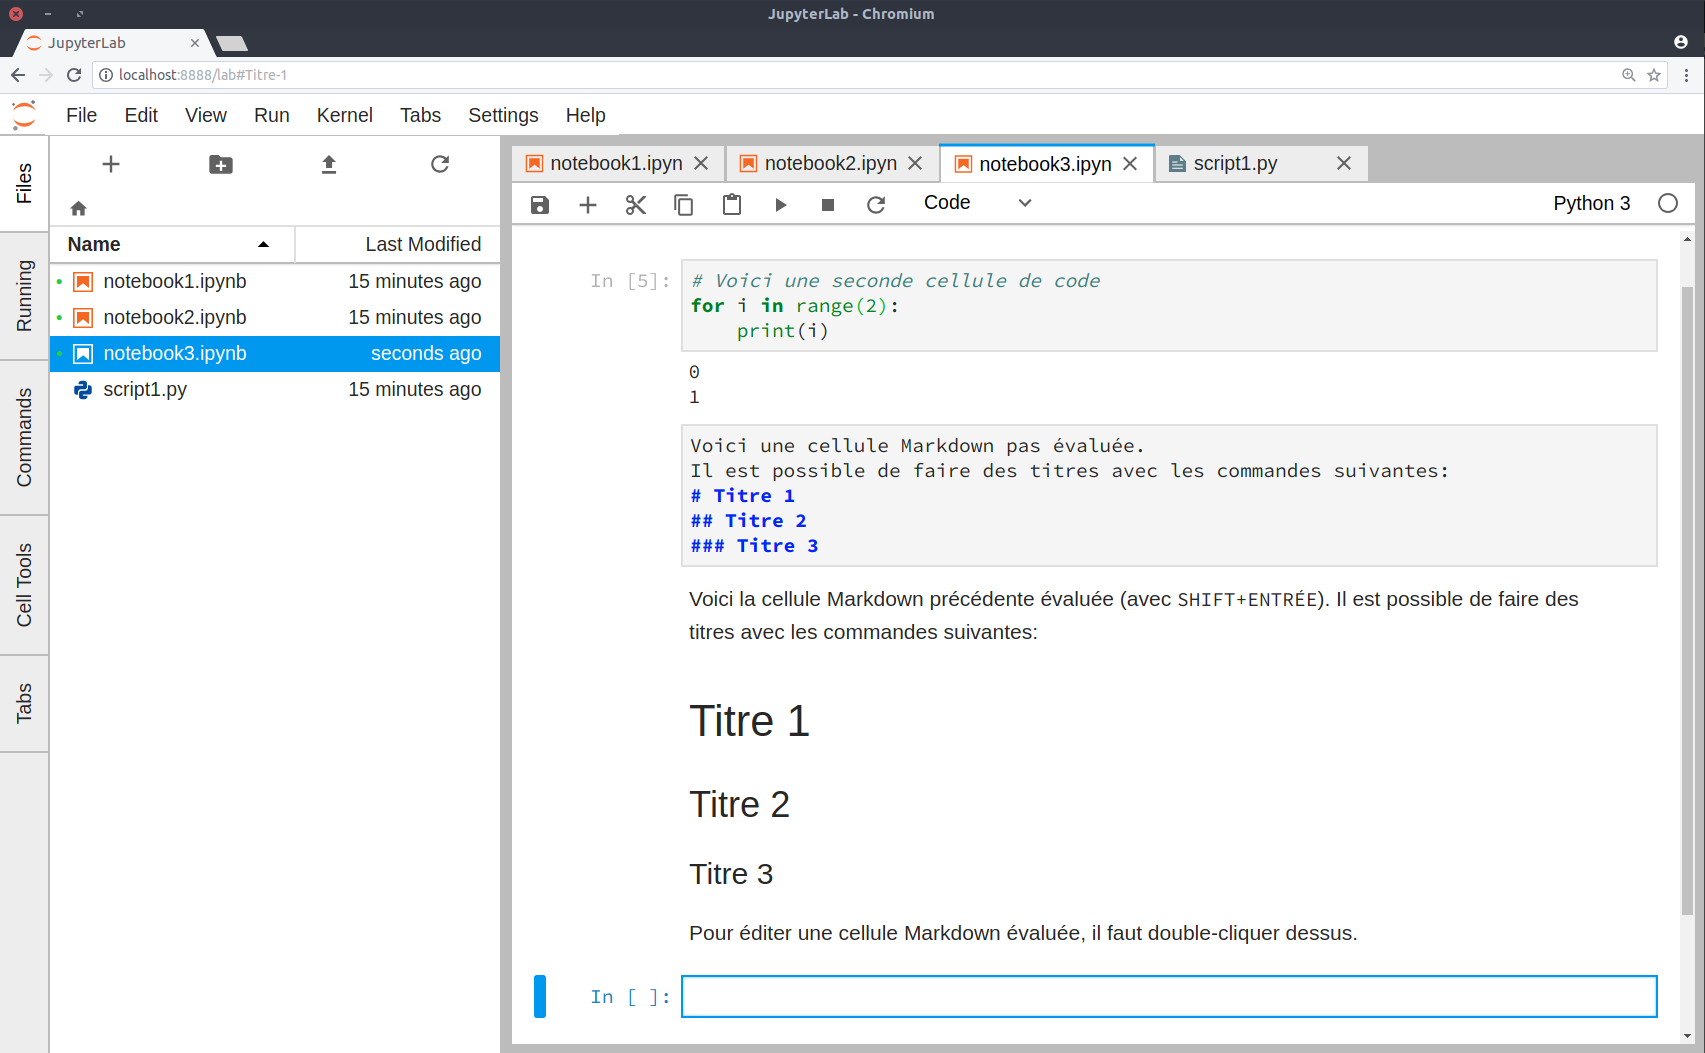
Once Jupyter Lab is launched, the following window should appear in a browser:

Jupyter Lab essentially allows for three types of documents: notebooks, scripts and terminals. A notebook consists of cells that can contain either code or text in Markdown format. The cells can be evaluated interactively on demand, which allows great flexibility. A Python script is simply a text file containing Python instructions. It runs from start to finish and it is not possible to interact with it interactively during its execution (unless it has been explicitly programmed). To execute a python script it is necessary to open a terminal.
A notebook is composed of cells, which can be of two main types: code cells and text cells, as shown in the following figure. Text cells can contain LaTeX formulas.
Detailed documentation for Jupyter Lab is available here.
Basic commands:
-
Create a new file: click on the
PLUSbutton at the top left, then choose the type of file to create. -
Rename a file: click with the second mouse button on the title of the notebook (either in the tab or in the file list).
-
Change the cell type: drop-down menu to choose between “Code” and “Markdown”.
-
Execute a cell: combination of
SHIFT+ENTERkeys. -
Run a script: type
python scriptname.pyin a terminal to run the scriptscriptname.py. -
Rearrange cells: click and drop.
-
Juxtaposing tabs: click and drop.